Specs:
– GPU: Zotac RTX 4070 Twin Edge
– CPU: Ryzen 7 5800X3D
– CPU cooler: Thermalright AXP90-X47 Full Copper with Noctua NF-A9x14 PWM chromax
– Storage: 2TB Samsung 990 Pro
– Motherboard: ASROCK B550 Phantom Gaming-ITX/ax
– RAM: 32GB T-FORCE VULCAN Z 3600MHz
– PSU: Silverstone 600W Platinum TFX
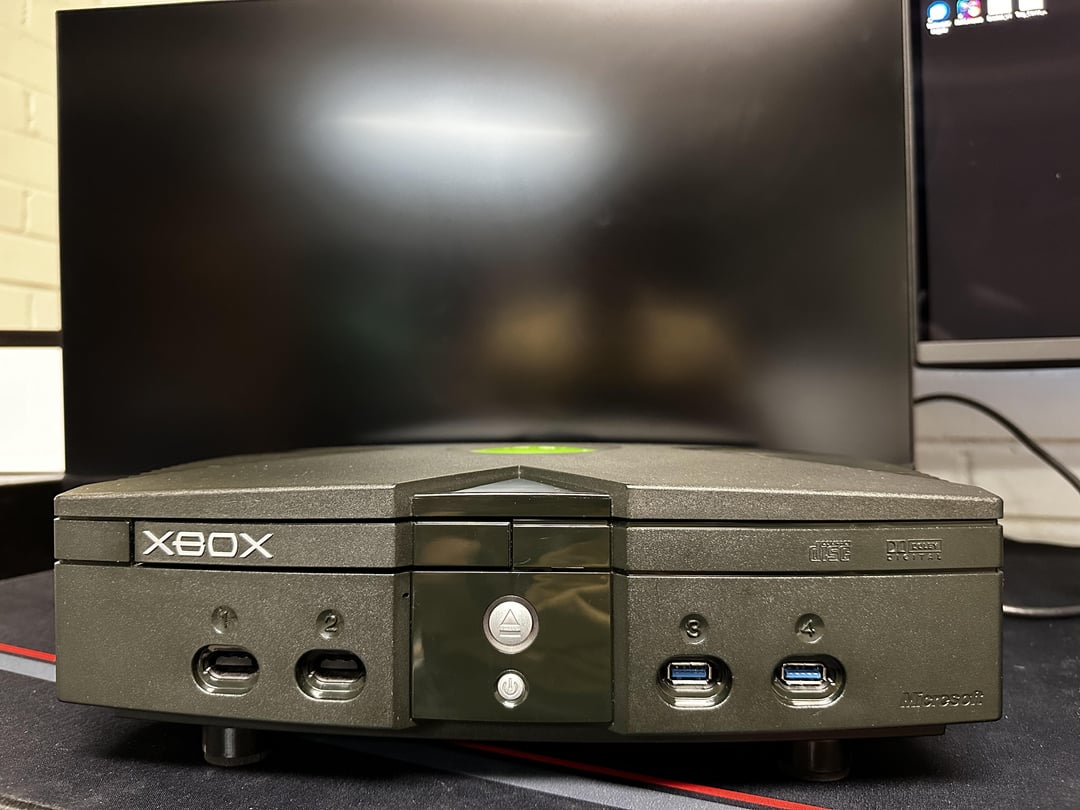
This project has been months in the making. I originally wanted to make this build in July. I used to collect old consoles, and upon realizing that I had two original Xboxes with fully dead motherboards (capacitor leaks), I thought it might be interesting to try to build a PC inside of one of them. I wanted to build the most powerful PC I possibly could inside of it, so picking out parts took a long time as I had to get the EXACT measurements of everything. An extra millimeter on the GPU was pass or fail.
I settled on the 4070 over a 3060 Ti simply for longevity. The 4070 will receive driver updates for longer and the goal is to keep the PC relevant for as long as possible. It needed to be able to play AAA games at decent frame rates at either 1440p or 4K. While the 4070 definitely wouldn’t be the first GPU I’d recommend to anyone, it’s the most powerful for the size I needed.
I chose the 5800X3D over the 7800X3D for two reasons: Cost and thermals. While the 7800X3D may not be THAT much hotter, every extra degree counts, as the cooler would need to be very small.
While doing research for the build, I discovered that the controller ports used USB 1.1, and it was capable of being rewired into an internal USB 2.0 port. This was perfect, since that meant I could keep two of the original ports and hopefully make them fully functioning original Xbox controller ports. After stripping some cables, soldering, heat shrinking, and finding out how to install drivers for it (huge shoutout to u/Heavy_Initiative2035 for linking me to the driver instructions), I had fully working ports. I didn’t need four ports though, so two were converted to USB ports plugged into the motherboard.
I was also able to find the pinout for the power button and LEDs. I purchased some front panel connector extension cables from Amazon and got to work. I ran into weird boot loops though, and discovered that it booted fine without the Power LEDs plugged in. I assumed that the power board had some traces connected in a way that made sense to the Xbox, but threw the PC through a loop (boot loop, if you will). So I desoldered the LEDs from the board, wired them individually, and used JBWeld ClearWeld to epoxy the LEDs in place alongside the diffusion plate. And boom! Fully functioning power button, the eject button is now a reset button, and the green LEDs light up as they should.
Now to explain a part that looks kinda janky… the method of attaching the lid to the body. I planned to use JB Weld epoxy to strategically attach bolts to the lid which would run down through the bottom, and would use washers and nuts to secure it in place. And this worked beautifully! Until it didn’t. About 5 minutes into a furmark stress test, the heat that built up softened the epoxy enough to let one of the bolts loose. I spent about a full day trying to come up with ways to attach it without doing major alterations that would be visible from the outside. One of the goals, after all, was to preserve the aesthetic of the original Xbox. I had a dumb, stupid idea: zipties. The Xbox has vents on both sides, just barely large enough for a medium sized zip tie to go through. Four zipties later and the lid was secure. Luckily, they’re not visible at all from the front, and they’re not too visible from the sides.
Last but not least was to lift the Ex-BOX enough for it to get enough room for the GPU to intake air. A bit of CAD modeling and 3D printing took care of that, with some non slip adhesive furniture pads added to them. They work like a charm! GPU maxed out at 82°C during a furmark stress test.
I will probably be selling it in the near future. I built it for fun and with the idea that selling it might make it possible to continue making unique and challenging builds. How much would you list it for?
W4spkeeper
*EA EA SPORTS ITS IN THE EA*
CaptchaVerifiedHuman
I haven’t seen one of those in a long, long, long time.
You just need the XL controller.
Cheesymaryjane
It’s called the exbox since that’s the kind of glow up you get after breaking up with your ex

7 Comments
Specs:
– GPU: Zotac RTX 4070 Twin Edge
– CPU: Ryzen 7 5800X3D
– CPU cooler: Thermalright AXP90-X47 Full Copper with Noctua NF-A9x14 PWM chromax
– Storage: 2TB Samsung 990 Pro
– Motherboard: ASROCK B550 Phantom Gaming-ITX/ax
– RAM: 32GB T-FORCE VULCAN Z 3600MHz
– PSU: Silverstone 600W Platinum TFX
This project has been months in the making. I originally wanted to make this build in July. I used to collect old consoles, and upon realizing that I had two original Xboxes with fully dead motherboards (capacitor leaks), I thought it might be interesting to try to build a PC inside of one of them. I wanted to build the most powerful PC I possibly could inside of it, so picking out parts took a long time as I had to get the EXACT measurements of everything. An extra millimeter on the GPU was pass or fail.
I settled on the 4070 over a 3060 Ti simply for longevity. The 4070 will receive driver updates for longer and the goal is to keep the PC relevant for as long as possible. It needed to be able to play AAA games at decent frame rates at either 1440p or 4K. While the 4070 definitely wouldn’t be the first GPU I’d recommend to anyone, it’s the most powerful for the size I needed.
I chose the 5800X3D over the 7800X3D for two reasons: Cost and thermals. While the 7800X3D may not be THAT much hotter, every extra degree counts, as the cooler would need to be very small.
While doing research for the build, I discovered that the controller ports used USB 1.1, and it was capable of being rewired into an internal USB 2.0 port. This was perfect, since that meant I could keep two of the original ports and hopefully make them fully functioning original Xbox controller ports. After stripping some cables, soldering, heat shrinking, and finding out how to install drivers for it (huge shoutout to u/Heavy_Initiative2035 for linking me to the driver instructions), I had fully working ports. I didn’t need four ports though, so two were converted to USB ports plugged into the motherboard.
I was also able to find the pinout for the power button and LEDs. I purchased some front panel connector extension cables from Amazon and got to work. I ran into weird boot loops though, and discovered that it booted fine without the Power LEDs plugged in. I assumed that the power board had some traces connected in a way that made sense to the Xbox, but threw the PC through a loop (boot loop, if you will). So I desoldered the LEDs from the board, wired them individually, and used JBWeld ClearWeld to epoxy the LEDs in place alongside the diffusion plate. And boom! Fully functioning power button, the eject button is now a reset button, and the green LEDs light up as they should.
Now to explain a part that looks kinda janky… the method of attaching the lid to the body. I planned to use JB Weld epoxy to strategically attach bolts to the lid which would run down through the bottom, and would use washers and nuts to secure it in place. And this worked beautifully! Until it didn’t. About 5 minutes into a furmark stress test, the heat that built up softened the epoxy enough to let one of the bolts loose. I spent about a full day trying to come up with ways to attach it without doing major alterations that would be visible from the outside. One of the goals, after all, was to preserve the aesthetic of the original Xbox. I had a dumb, stupid idea: zipties. The Xbox has vents on both sides, just barely large enough for a medium sized zip tie to go through. Four zipties later and the lid was secure. Luckily, they’re not visible at all from the front, and they’re not too visible from the sides.
Last but not least was to lift the Ex-BOX enough for it to get enough room for the GPU to intake air. A bit of CAD modeling and 3D printing took care of that, with some non slip adhesive furniture pads added to them. They work like a charm! GPU maxed out at 82°C during a furmark stress test.
I will probably be selling it in the near future. I built it for fun and with the idea that selling it might make it possible to continue making unique and challenging builds. How much would you list it for?
*EA EA SPORTS ITS IN THE EA*
I haven’t seen one of those in a long, long, long time.
You just need the XL controller.
It’s called the exbox since that’s the kind of glow up you get after breaking up with your ex
I love PC builds retrofitted in consoles.
Nicely done.
You should post in r/sffpc
Ok this is epic!