
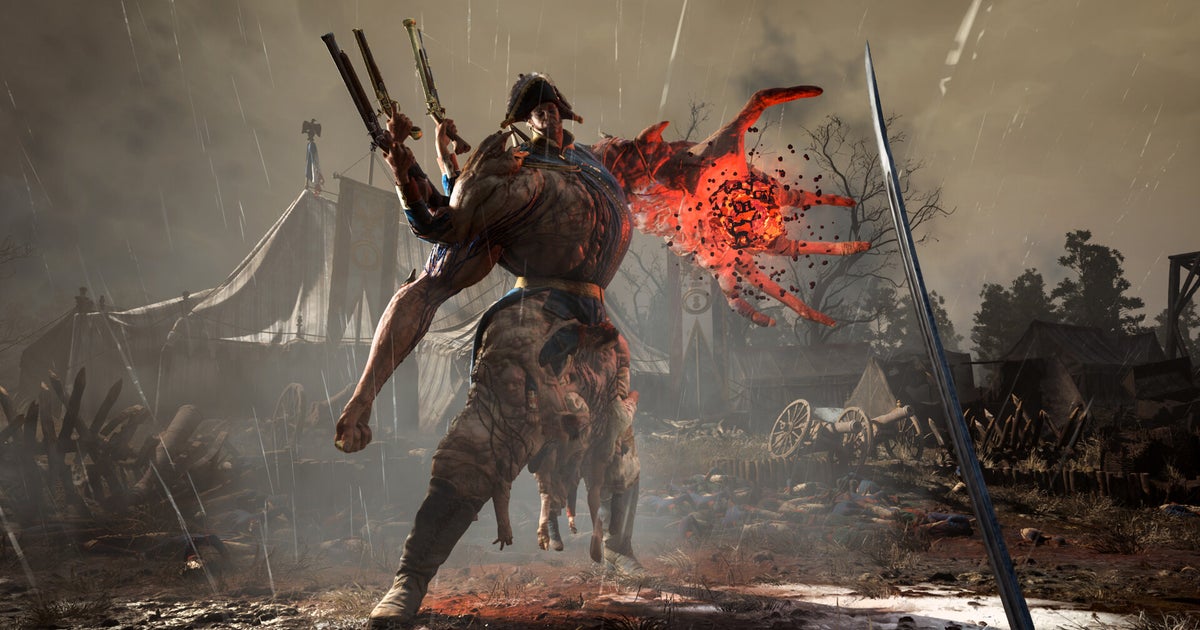
Valor Mortis’ bosses are a real treat for those of us who enjoy fighting mutated abominations or have a love for Dark Souls 3 (if you know, you know). Featuring some of the most fun and distinct bosses I’ve fought in a good while, those of you stepping into the shoes of William are likely not prepared – in a good way! – for what bosses you’re set to fight.
Below, you’ll find an overview of all bosses in Valor Mortis and what to expect from them, as well as some tips for taking them down should you be here looking for some assistance. There’s no summons or support in Valor Mortis after all!
To see this content please enable targeting cookies.
Manage cookie settings
Looking for more help with William’s journey? Take a look at my Valor Mortis walkthrough, guides, and tips.
All bosses in Valor Mortis
The below table lists every boss in Valor Mortis, alongside where you’ll be fighting them.
It’s also accompanied by a checklist so you can quickly identify which ones you’ve fought and who you’re left to challenge. On top of that, you can press any boss name in the below table to be taken to a brief overview of the fight and some tips for taking them down.
With the above in mind, the below guide does contain light spoilers, and reveals the appearance of each boss. And as much as I want you to read this guide in its entirety (I have spent the time writing it, after all), if you haven’t challenged a boss listed below yet, I highly recommend you stop reading there. Some of Valor Mortis’ bosses are, frankly, some of the most fun surprises I’ve experienced in a Soulslike in a while, and you’re best going into them blind.
General Lothaire, The Eagle Bearer
General Lothaire is the first boss you’ll face in Valor Mortis, and as is tradition with these games at this point, you’ll end up fighting him twice. Your first fight against him in the Valley of Ashes is scripted to end with you dying but don’t worry, as you get to thoroughly beat this guy to a pulp later before entering the Abandoned Church.
Lothaire’s moveset isn’t anything too unfamiliar if you happen to have played a Soulslike before; there’s a sweeping combo using his mutated arm, lunge attacks, and projectiles fired from the guns attached to his back. Most of this can be parried, quickly building up his stagger bar, and allowing you to go in for a critical attack. He’s your first real test in Valor Mortis and the perfect opportunity to apply everything you’ve learnt so far (and get used to fast-paced first-person combat).
If you need some help taking this fella down, here’s my guide on how to beat General Lothaire.
Image credit: One More Level/Eurogamer
The Iron Marshall
Later on in the Fallen Village, you’ll find yourself fighting The Iron Marshall. This fellow is particularly slow and in my opinion, a little less challenging than that of General Lothaire as a result. This is all good news as well, as following this fight, you’ll be running into Remnants of the Iron Regiment – less powerful version of this boss – throughout your journey.
The trick to this fight is to ultimately keep your distance, relying on your Fire Transmutation and ammunition to burn him to a crisp and target the weak spot on his back. You can go all in and melee this boss, but I found his sweeping attacks to catch me off guard more than I’d like, so ranged was the way to go personally.
Image credit: One More Level/Eurogamer
Sphinx, Devourer of the Unworthy
The fight against Sphinx, Devourer of the Unworthy is when things begin to get very interesting in Valor Mortis. After exploring the Caverns, you’ll find yourself magically whisked away to the Pyramids to fight Sphinx in what is an epic fight that completely turned my initial opinions of Valor Mortis around.
The Stasis Transmutation is your best friend during this fight, as well as your firearms. Sphinx is incredibly fast and agile, and Stasis is very necessary to slowing them down – and even freezing them in place – during this fight so you can attack them. They also have two health bars, but the upside is that they have a weak spot on their face during the second phase that you can target using the abundant ammunition dropped during this fight.
If you need some help taking this boss down, here’s my guide on how to beat Sphinx.
Image credit: One More Level/Eurogamer
Slaughtermill
Slaughtermill comes next, and this is arguably a gimmick fight. A gimmick fight which reminds me massively of the fight against the Curse-Rotted Greatwood in Dark Souls 3, as you’re targeting the bulbous weak spots on this creature and the second half of the fight takes place underground. Not only that, but the second half of this fight features a lot of platforming and a soundtrack that feels heavily inspired by Mick Gordon, and it’s so much fun.
During this fight, simply follow the ‘prompts’ as they appear, whether that’s shooting a weak spot, pulling a blue Nepthoglobin node, or grappling over to the building itself. Between that and dodging out of the way of its tentacles and Carrion summons, this fight isn’t too troublesome as opposed to what you’ve faced already.
Image credit: One More Level/Eurogamer
Anna, The Bride Drowned in Tears
Anna, The Bride Drowned in Tears is a humanoid boss that you’ll encounter in the Cursed Hollow, and she’s giving Celebrant from Elden Ring’s Windmill Village if I’m being honest. While she’s fast and constantly trying to slice at you with her butcher knife – and even summons fellow Shambling Civilians to her aid – she’s particularly squishy and not too difficult to stagger.
I focused on using the Fire Transmutation on her personally and performed heavy attacks whenever she was briefly stunned. It’s also worth equipping some kind of explosive such as a Hand Grenade for this fight, because the most troublesome part of it all is when she summons friends to help, as you can quickly become overwhelmed by them. A Hand Grenade can quickly solve that problem though, allowing you to go back to focusing on Anna.
Image credit: One More Level/Eurogamer
High Justicar Aurelius, Last of the Faithful
High Justicar Aurelius, Last of the Faithful is one of Valor Mortis’ many Eternal Guardsman, but something has taken hold of this soldier, allowing them to mutate as they take part in duels against you. You’ll have fought a lot of swordsmen by this point and should treat this as a melee duel of sorts in my experience, poking him and parrying where opportunity arises. That said, some Fire will never go amiss with helping deal some additional damage over time.
When Aurelius pops a flask, prepare for him to mutate, unleashing a huge bulbous arm – much like that of General Lothaire – that he can attack you with at great range. I tried my best to simply stay out of the way and dodge until his flask wore off during these portions of the fight, as it’s much easier to try attacking him when he’s in his humanoid form and poses less of a threat.
Image credit: One More Level/Eurogamer
Experiment 33
Upon entering the Lighthouse in hot pursuit of the mysterious Shrike from William’s visions, you’ll be met with something much more disturbing. So much so that it looks like it’s stepped out of a Resident Evil game, and that’s Experiment 33. This mutated abomination that consists of more limbs than you can count will follow you around the Lighthouse’s basement trying to get close enough to you to attack.
If your first thought for this boss was ‘kill it with fire’ much like mine, then you’d be correct. For this fight, I ran circles around the area while Experiment 33 followed, and I’d turn to build up my Fire Transmutation on it every time I had enough Nepthoglobin to do so. If there was ever a time to use your Nepthtoglobin Vials too, this is it. Between building up Fire and using your firearms to target its weak spots from afar, you’ll squash this boss in no time.
Image credit: One More Level/Eurogamer
The Orphan
I hope you’re ready for things to take an even darker turn with your boss fight against The Orphan in Valor Mortis. This poor soul, who you may have already seen lurking around the rotting laboratories, fights you in an arena that has poison vents almost everywhere. This means you’ll be dodging the boss himself as well as the poisonous vents, and making use of your shiny new Shield Transmutation.
The boss itself isn’t too bad in terms of his moveset, but he hits hard and has lengthy, sweeping combos. Once again, I made good use of the Fire status effect here to keep his health ticking downwards while melee attacking wherever possible. During The Orphan’s second phase, using a few Oil Grenades while he’s against a wall is also worthwhile. In my experience, I was able to continually build the Fire status effect on him between this and Flaming Whetstones, which made light work of things.
Image credit: One More Level/Eurogamer
Captain Raphael of the Nephtis Superioris
Captain Raphael of the Nephtis Superioris is a humanoid enemy who wields both a blade and pistol, and as William notes following the fight, they bear a striking but sickening similarity to one another. This adept swordsman is also capable of healing himself throughout the fight, which arguably forces you to play as aggressively as possible if you wish to stand a chance against him.
While my approach to many bosses has involved playing it safe and using Fire, Captain Raphael required the opposite. I kitted myself out with Nepthtoglobin Vials and used the Shield Transmutation throughout, allowing myself to block his attacks, deflect his bullets, and occasionally stagger him. This allowed me to keep close enough so that I could attack him whenever he went to use a Flask, and when Captain Raphael can’t heal, trying to deplete his health bar is a little less intimidating. Grenades – or your firearms – can also be used to prevent him from healing in a pinch.
Image credit: One More Level/Eurogamer
Entity, Voice of the Void
The Entity, Voice of the Void fight starts out with you fighting a humanoid enemy who looks terribly familiar. It’s like looking in a mirror! But of course, there’s a little more to this fight than what you’re first presented with, and that’s largely your foe’s summons. Lots of them in fact, and many that you won’t be happy to see reappear.
I don’t want to spoil the ultimate fight too much, but what I will say is be prepared to use everything you have learnt so far in Valor Mortis! The Shield Transmutation is also your best friend here, and as for those summons, remember you can take them out with a single hit and I recommend that you prioritise doing so before dealing with the boss himself…
Image credit: One More Level/Eurogamer
For more on Valor Mortis, take a look at my list of all Amber locations, how to upgrade your weapons, and where to find all Empty Ferrofluid Flasks.