
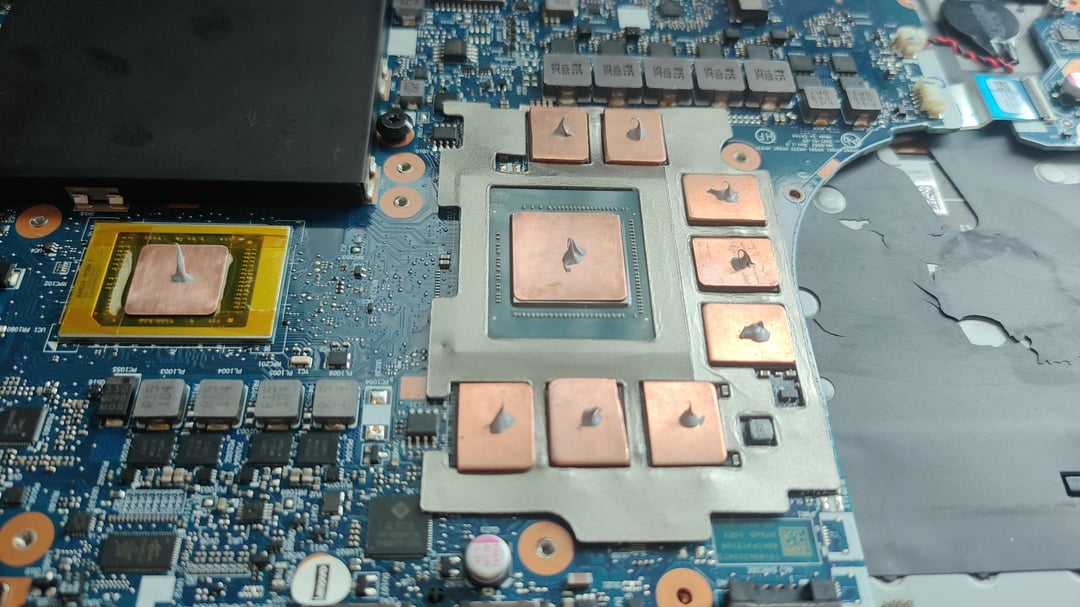
So, after watching some videos I thought it would be a nice little project to try to copper mod my laptop and replace some of the silicone pads with copper shims. As a plan b I also purchased upsiren UX pro ultra and the new llano phase change pads.
First, I measured the distance between all the chips, cpu, gpu and likewise the matching ends on the heatsink, so I could choose the correct shim thickness for each chip. I purchased copper shims ranging between 0.1mm and 1.5mm, and in 15x15mm and 20x20mm so I had a lot of choice. First, I tried to find the correct thickness for the shims I'd place on the CPU and GPU die and found 0.3mm to be the sweet spot. I tested this by placing the shims on the CPU and GPU, put a little paste on them, then tightened the heatsink and take it off again to see if the paste was evenly squashed. This worked well and the shims stuck to the heatsink tightly after lifting it.
Next were the VRAM chips, which were all around 15x12mm, which meant I needed to cut the shims in the right size. For the chips on the right and bottom (3+3), 0.8mm seemed to be the correct height and for the top 2 I opted for 1.2mm as the distance to the heatsink for these 2 was slightly higher. Cutting the shims took a few hours as I had a rechargeable little grind tool, which ran out of juice after every shim. Once they were all cut I placed them on the chips, together with the shims for the CPU and GPU (which didn't need to be cut as the GPU (RTX 3070) is 20x20mm and the CPU (5800h) is slightly smaller than 15x15mm). I put a little paste on them and placed the heatsink on and tightened it to see if so shims made good contact. Upon lifting the heatsink I find all the shims sticking to the heatsink, so it looked like this part was finally done.
Next, I cut out some silicone pads with a slightly lower profile to place around the shims. There's already a protective bracket with cut outs for the VRAM chips, which prevents short circuits and shims moving around and the paste and pressure of the heatsink should keep the shims in place as well, but in order to be on the safe side I figured some extra padding wouldn't hurt.
Next, I put some UX pro putty on the remaining chips, pasted everything up and closed up the laptop for a test:
1: cinebench 2024 gave me 8% better results than the same test before I started. I went from 637 to 689 points. Temps were the same (100 degrees Celsius) as this is what this cpu will go to under load. Core clocks went from an average 3.3Ghz to 3.8Ghz, which means that in order to reach 100 degrees, the clock speeds were 500mhz higher on average.
Next, the GPU.. I had run furmark donut 6500mb in 1080p mode before I started and got around 76 degrees with 40fps on stress test. After the mod that went up to 85 degrees, so I wasn't pleased with that and took the laptop apart again. Long story short, I added another 0.3mm shim to the GPU and tried again with similar results, then removed the VRAM shims and tried putty instead, which was a bit better but I still wasn't pleased and by now an entire day went by.
I decided to give plan b a try, so removed all shims, cleaned everything up, cut out the phase change pads and placed them and put the UX pro putty everywhere necessary. Closed everything up again and ran another test:
Cinebench gave sightly better results (691) as with the shims, core temps were the same, l3 cache temps were 10 degrees lower.
Furmark test was a bit better than with shims as well, but still 3 degrees higher than baseline. Since the CPU results were good and GPU results were well within limits (78 degrees max ) I decided to stick with it.
Lastly, I put the laptop on a Llano laptop cooler and this made the most difference. I've tried 2800rpm all the way down to 300rpm:
Cinebench: 709 points (+18 points), temps maxed out at 85 degrees instead of 100. Core clocks we 3900-4000 throughout the test.
Furmark:
GPU temps went down from 78 to 60 max. Fps remained the same.
I let furmark run for a while, while lowering the rpm on the llano cooler and found 1000rpm to still give good cooling (65 max instead of 78), while keeping the noise reasonable. Even 500rpm kept temps below 70, but then the laptop's fans would start spinning faster and get louder than the llano cooler.
So all in all this was a fun experiment and fun now on I'll use phase change silicone and upsiren UX pro putty for future builds. I can't recommend the copper mod as it didn't perform better, although more experiments with different thicknesses could provide better results – it's just too much hassle