
This is a guide and checklist to the locations of all 42 Skulls in Halo: Campaign Evolved hidden throughout all its missions. Three Skulls can be found in each, and once collected, can be activated to apply various in-game modifiers. Keep track of which you’ve found with IGN’s handy checklist.
Halo: Campaign Evolved features 42 total Skulls to collect, with a variety of Legacy (pre-existing) Skulls from prior iterations of Combat Evolved, and a selection of brand new Skulls exclusive to Campaign Evolved. There are 3 Skulls per level to find, so keep your eyes peeled even if you’ve already found one or two!
Boarding Action
If you find all three Skulls and the Terminal in the Boarding Action mission, you’ll unlock the Souvenirs trophy/achievement.
Boarding Action Skulls
Malfunction
Johnny Ammo Seed
Leadhead
Malfunction Skull
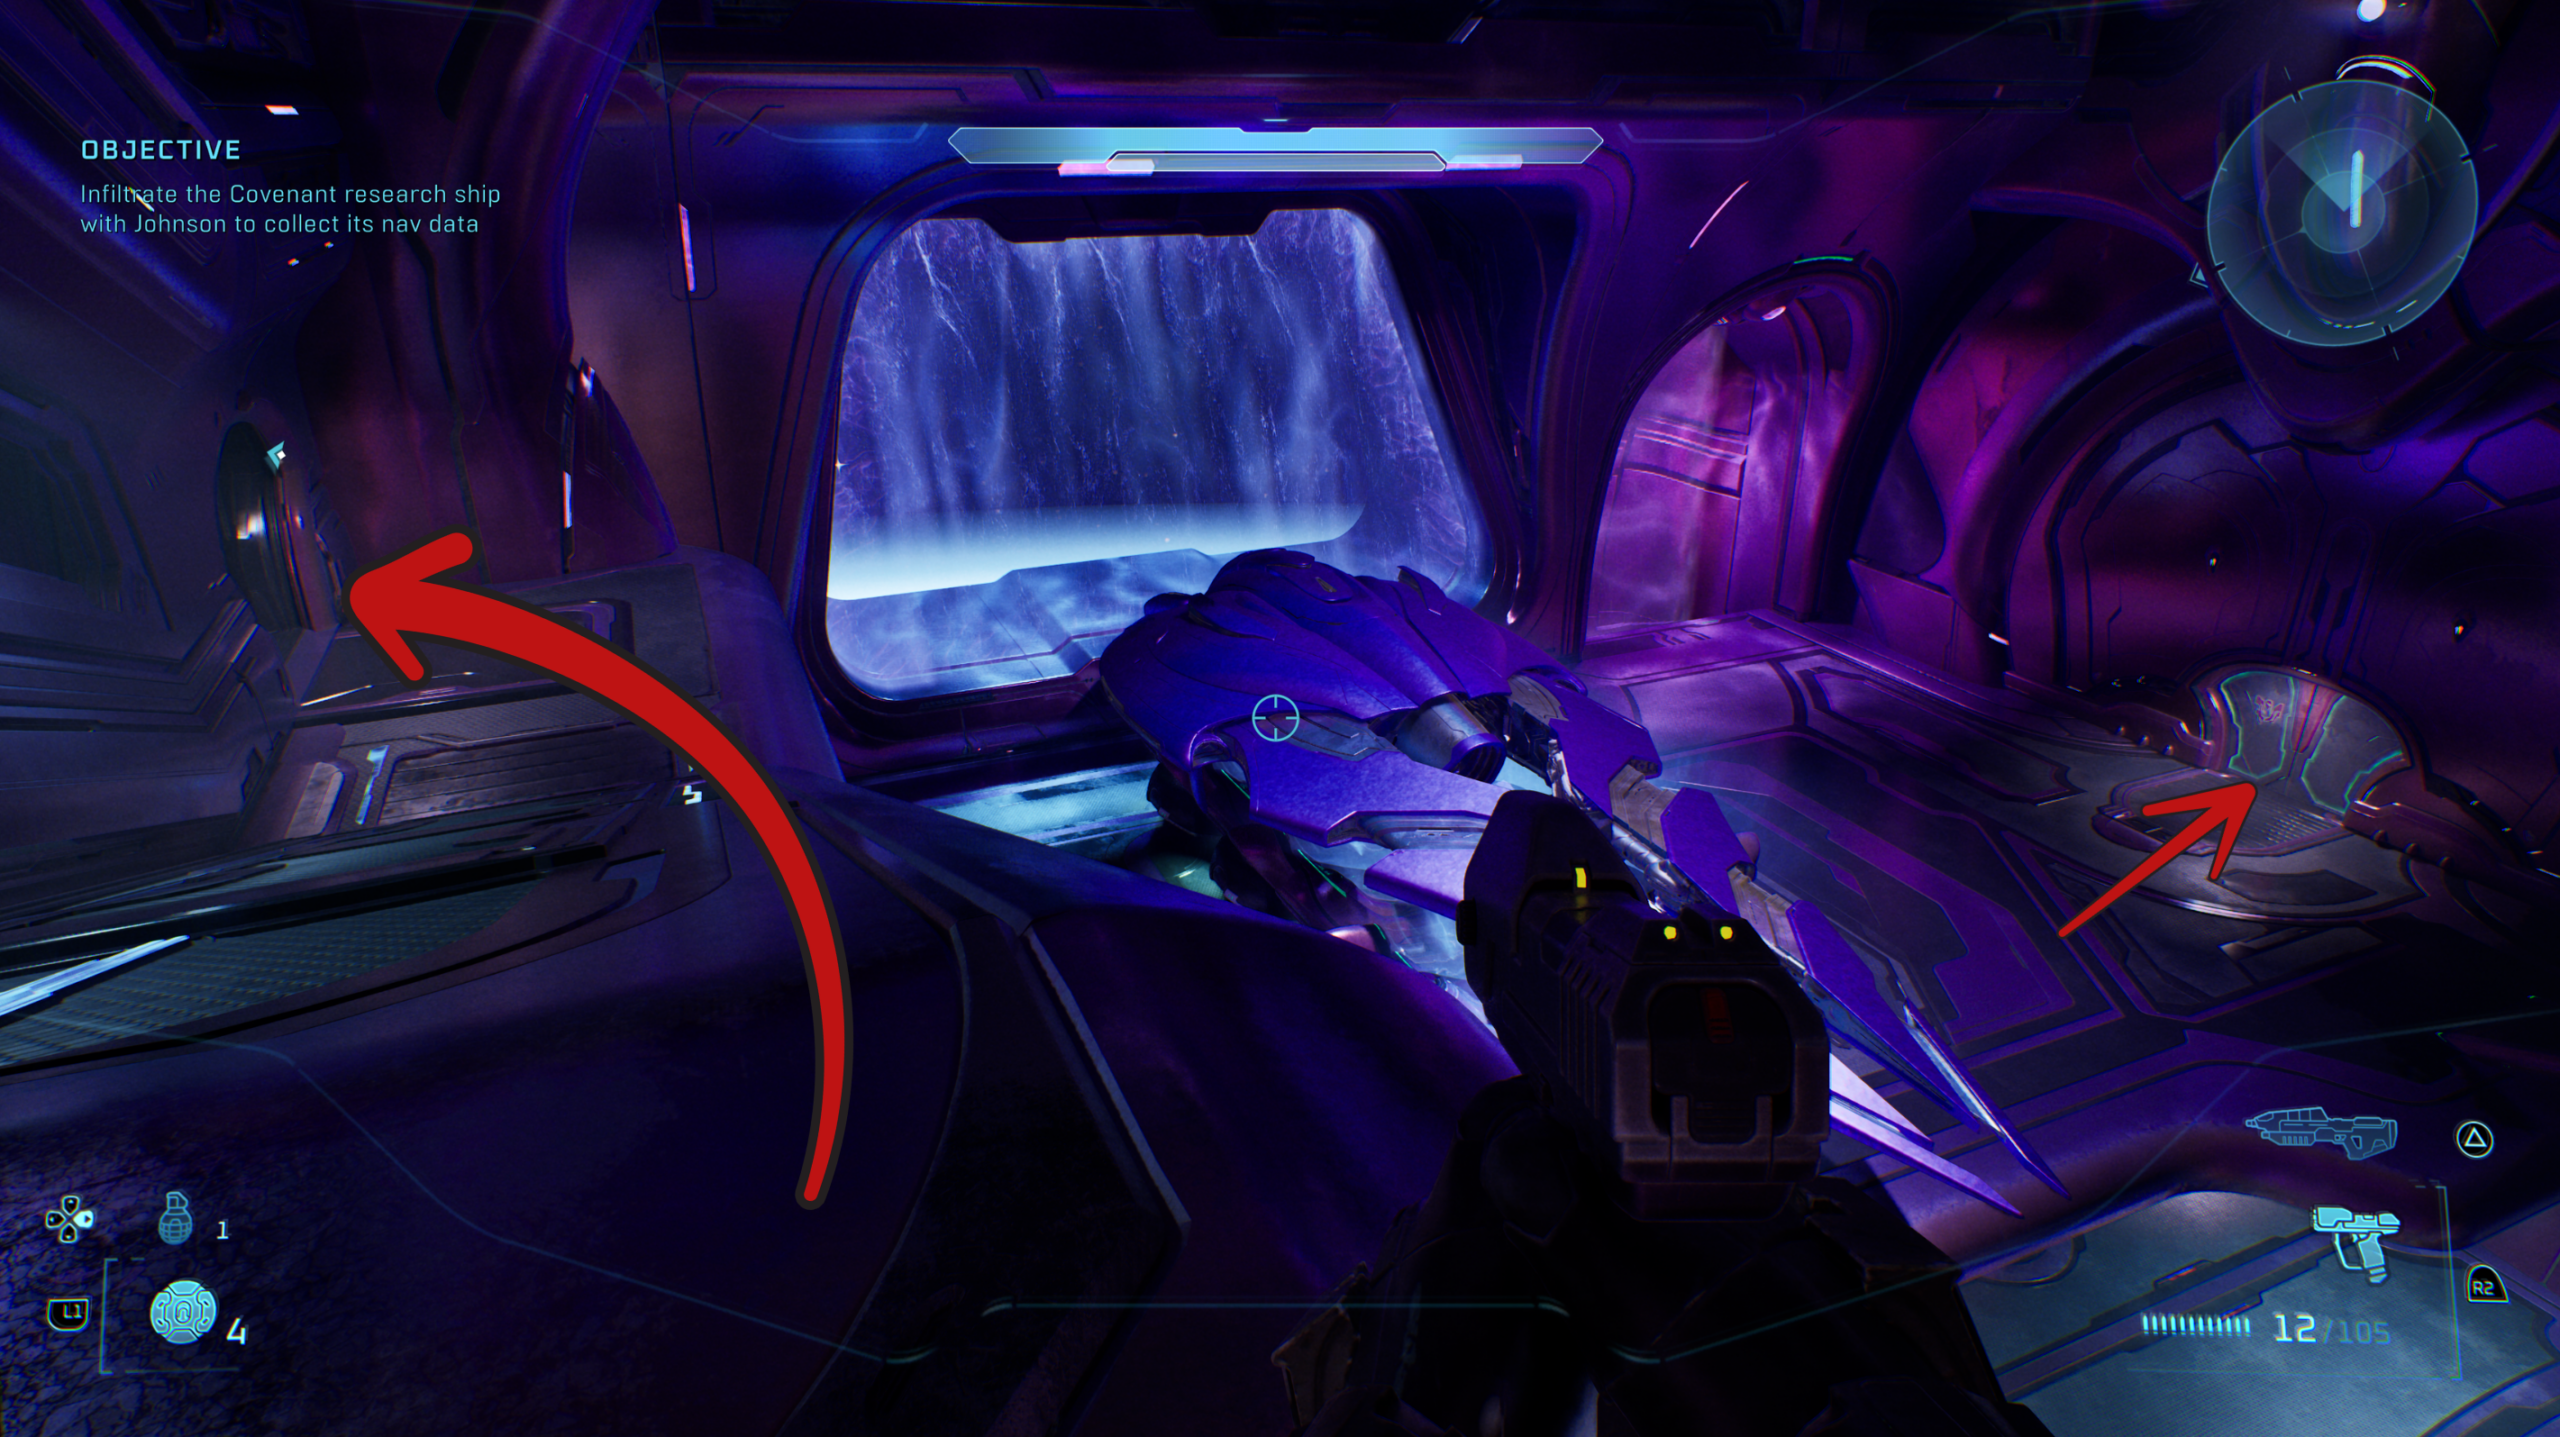
This Skull can be found in the Boarding Action prequel mission. After defeating the two Hunters partway through the level, instead of following Johnson up the nearby slope, head down the ramping path directly across from where you came up.

Follow the corridor through the open door as it spirals down and around, then head through the unlocked doors across the bay on the other side of the ship. On the walkway to the right in the subsequent room you’ll find the Skull on the ground.
Skull Effect: The Malfunction Skull, once activated, makes it so that upon respawn a random element of your HUD no longer appears.Johnny Ammo Seed Skull
This Skull can be found in the Boarding Action prequel mission. After defeating all the enemies in the large Elite training room with the sand, instead of going up to meet with Johnson at the tractor beam above, go through the open doors above where you entered the room from.
Go through either door and follow the path to emerge on the upper platforms in the previous large room. Several more Elites that spawn in on the left side through a previously closed door. Once they’re defeated you can find the Skull on the ground on the curved section of the walkway reaching into the center of the room.
Skull Effect: The Johnny Ammo Seed Skull, once activated, makes it so that when reloading you lose the ammo remaining in the discarded clip.Leadhead Skull
This Skull can be found in the Boarding Action prequel mission. Towards the end of the level, you’ll be heading for the upper decks of the Triumph of Tolerance. Upon entering a room with a large vertical tractor beam towards its back middle, you’ll need to defeat waves of Covenant enemies (including Brutes) that emerge from the doors and several that take the beam down into the room.
Once all the enemies are dead, don’t take the tractor beam up quite yet. Instead, make your way to the back left side of the room. Head into the open hallway to the left of the tractor beam platform and go up the small slope to the left to find the Skull on the ground at the dead end.
Skull Effect: The Leadhead Skull, once activated, makes it so that headshots no longer provide extra damage or instant kills.The Most Dangerous Game
If you find all three Skulls and the Terminal in The Most Dangerous Game mission, you’ll unlock the Brute Loops trophy/achievement.
The Most Dangerous Game Skulls
Temperamental
Recession
Ghost
Temperamental Skull
Getting the Temperamental Skull requires a keen eye. This skull is not sitting around to be found, and instead, you have to unlock it by shooting a particular golden Elite with purple accessories wielding an energy sword three times throughout a single run of the mission. This guy:
After successfully getting a shot on him the three times they appear, the skull drops after clearing out the rest of the Covenant in their final area. Here are the locations:
The first appearance is in the arena just before the entrance of the prison facility, where you’ll have to carefully take out Jackals sniping around the area, mostly in the trees. You’ll spot your target on the upper right side of the arena, overlooking the battlefield. Shoot him and he’ll run away through the door behind him:
The second appearance is just in the next arena over to the entrance of the prison facility. You’ll spot the shiny Elite far in the back at the entrance to the next area, standing there. You’ll need to get past the Wraith standing by and all the many enemies, so be careful. If you don’t shoot him fast enough, though, he will leave through those doors. Be quick about it:
The third time you’ll find the golden Elite is immediately in the arena where you leave the prison facility. After you hear Johnson and Williams talk about the Covenant’s “shipping” operations, you’ll pass through a door that leads outside. Look up and to the left, and you’ll see your target (Johnson marks him on this one as the Marines recognize the Elite as a high-value target) Shoot him, and he leaves. You will not kill him here!
All that’s left is to clear out the enemies in this outdoor arena. Clear all waves of enemies. Once that’s done, you’ll find the Temperamental Skull tucked in the Covenant’s purple pylon that’s on the higher ground of the arena.
Recession Skull
This Skull can be found in The Most Dangerous Game mission. When you reach the entrance to the prison facility (where you’ll find a long bridge and a Wraith to destroy at the far end), look at the lit braziers either side of the giant locked door on the near side of the bridge. You’ll see one explosive canister in each of the flames.
Destroy both however you see fit (shoot them or toss frag grenades at them) and the door will then unlock and open, revealing the Skull on the floor inside.
Skull Effect: The Recession Skull, once activated, makes it so that every shot expends twice the normal amount of ammo.Ghost Skull
NOTE: This skull is one of the more finicky in the game, as it either requires you to have a co-op partner you can stand on, or to grenade jump.
This Skull can be found in The Most Dangerous Game mission. After you turn on the two successive bridges where the Banshees appear for the first time, you’ll pass through a short cave tunnel. The skull is in the gate at the end of the tunnel. Clear the hostiles first, and if you’re playing on Legendary, walk forward after the two waves (but do not pass through the far gate) to get a checkpoint. Then, run back to the gate. You’ll likely hear the skull (eerie high-pitched sound with ghostly breath). The skull is on the backside of the gate, or the side inside this open-air arena. It’s in the brazier that’s next to the ledge, to the left from where you entered the arena.
To get to it, you’ll need to hop onto a partner to jump up to the ledge, or carefully toss a grenade then do a jump while moving toward the higher ledge. Do not use a plasma grenade, the standard issue UNSC frag grenades are in the gate if you don’t have any!
Once you’re up, you can use the slightly higher ledge along the wall to jump into the brambles and then into the gate’s brazier to collect the Skull.
Skull Effect: The Ghost Skull, once activated, makes it so that enemies no longer flinch when taking fire.Heavy Burden
If you find all three Skulls and the Terminal in the Heavy Burden mission, you’ll unlock the Parting Gifts trophy/achievement.
Heavy Burden Skulls
Eye Patch
Grunt Birthday Party
Efficient
Eye Patch Skull
This Skull can be found in the Heavy Burden mission. As you’re crossing the suspended walkway to reach the Tolerance’s bridge, up to your left is a slightly higher walkway. Go through the unlocked door that’s ahead of you just before turning and crossing the bridge, then head to the far side of the walkway and find the Skull on the narrow ledge to the right of the locked door.
Skull Effect: The Eye Patch Skull, once activated, makes it so that all auto-aim is disabled for all weapons.Grunt Birthday Party Skull
This Skull can be found in the Heavy Burden mission. In the giant open white and gold room with multiple levels, you’ll see a large vertical stone spire with yellow foliage. Atop the spire is the Skull, which you can jump across to from the nearby circular platform. This is easiest if you quickly jump into the purple fire pit you find there and then carefully sprint jump across to the spire.
Skull Effect: The Grunt Birthday Party Skull, once activated, makes it so that Grunt headshots produce legendary celebrations.Efficient Skull
This Skull can be found in the Heavy Burden mission. As you’re riding the floating transport near the end of the level, after restarting the power and continuing to ride ahead, you’ll reach a section where there are two platforms either side of the transport swarming with Covenant.
Quickly sprint jump onto the platform to the left and rush to the back right corner, where the Skull can be found on the ground. Grab it quickly before the out of bounds timer hits zero.
Skull Effect: The Efficient Skull, once activated, makes it so that enemies killed while the player is at full health drop more ammo.The Pillar of Autumn
If you find all three Skulls and the Terminal in The Pillar of Autumn mission, you’ll unlock the Clean Sweep trophy/achievement.
The Pillar of Autumn Skulls
Speed Limit
Magnified
Perspective
Speed Limit Skull
This Skull can be found in The Pillar of Autumn mission. In the very first room at the beginning of the mission as you gain control, turn around and jump onto the two cylindrical containers in the back corner.
From there, jump up onto the walkway nearby and head to the far end (near the viewing window) to pick the Skull up from the ground.
Skull Effect: The Speed Limit Skull, once activated, makes it so that Sprint is disabled.Magnified Skull
This Skull can be found in The Pillar of Autumn mission. Shortly after the Covenant attack begins, as you make your way to the bridge you’ll enter a larger room with various rows of lockers. On top of one of the lockers on the nearest side of the room you’ll find the Skull.
Skull Effect: The Magnified Skull, once activated, makes it so that 60-round magazines for the AR are now standard-issue.Perspective Skull
This Skull can be found in The Pillar of Autumn mission. After receiving Cortana from Keyes in the cutscene, go back into the bridge of the ship and drop down beneath where the two pilots are seated. In this small alcove to the left of the ladder is the Skull.
Skull Effect: The Perspective Skull, once activated, makes it so that the player camera is changed to third-person.Halo
If you find all three Skulls and the Terminal in the Halo mission, you’ll unlock the Successful Search trophy/achievement.
Halo Skulls
Grunt Funeral
Give & Take
Floor is Lava
Grunt Funeral Skull
This Skull can be found in the Halo mission. As you are tasked with exploring and securing the three lifeboat crash sites, head to the left-most site (left at the top of the initial hill). When there, defeat the Covenant and then jump onto the main large metallic spire.
Carefully walk up the slope as much as possible, then throw a UNSC frag grenade ahead of you. Quickly turn around and jump across the gap to the higher slope across from you. The Skull can be found at the top of this section.
Skull Effect: The Grunt Funeral Skull, once activated, makes it so that Grunts die in a blaze of plasma.Give & Take Skull
This Skull can be found in the Halo mission. As you are tasked with exploring and securing the three lifeboat crash sites, follow the river in the central region upstream underneath the large rocky overhang. Behind the large rock directly on the waters edge on the left-hand side, you’ll find the Skull.
Skull Effect: The Give & Take Skull, once activated, makes it so that firing your weapon drains your shield, but dealing damage to enemies recharges it.Floor is Lava Skull
This Skull can be found in the Halo mission. As you are tasked with exploring and securing the three lifeboat crash sites, head to the right-most crash site (amidst the large rocky outcroppings). Go up the sloped hill to the top, then leap across the gap to the large grassy platform to the right (while looking downhill). From there, drop down onto the rock formation slightly further downhill to find the Skull atop it.
Skull Effect: The Floor is Lava Skull, once activated, makes it so that you take continuous damage whenever touching the “ground”.The Truth and Reconciliation
If you find all three Skulls and the Terminal in The Truth and Reconciliation mission, you’ll unlock the Plundered trophy/achievement.
The Truth and Reconciliation Skulls
Iron
Endurance Spec
Foreign
Iron Skull
This Skull can be found in the Truth and Reconciliation mission. As you reach the gravity lift that’ll raise you into the ship, head to the far side of the lift (by the cliff edge) and look for a horizontal white light in the ground.
Look over the ledge just beyond this light to find the Skull on a small ledge down below.
Skull Effect: The Iron Skull, once activated, makes it so that dying in co-op resets you to your last checkpoint, and dying while solo restarts the level.Endurance Spec Skull
This Skull can be found in the Truth and Reconciliation mission. As you enter the larger room early aboard the Truth and Reconciliation, you’ll be on the upper walkway with two destroyed Wraiths and several Covenant below you.
Walk to the far end of the room and follow the curve around to the right. Jump on top of the purple container near the edge and then bunny hop jump across the three curved support struts to reach the Skull resting on the third one. This can be tricky to reach as it’s difficult (but not impossible) to stay put on these struts. If you fall down, you can use the nearby doorway in the corner and follow the path as it loops up and around to get back to the walkway.
Skull Effect: The Endurance Spec Skull, once activated, makes it so that UNSC vehicles cannot be damaged.Foreign Skull
This Skull can be found in the Truth and Reconciliation mission. As you enter the large hangar bay aboard the Truth and Reconciliation, rush to the back right-hand side of the room from where you entered and wait for some enemies to spawn in and open the locked doors.
Rush inside before the doors close and lock again to find the Skull on the ground in an alcove on your left.
Skull Effect: The Foreign Skull, once activated, makes it so that players cannot use weapons from another faction.The Silent Cartographer
If you find all three Skulls and the Terminal in The Silent Cartographer mission, you’ll unlock the Buried Treasure trophy/achievement.
The Silent Cartographer Skulls
Bandana
Acrophobia
Hip Fire
Bandana Skull
This Skull can be found in The Silent Cartographer mission. Outside the beachside facility where the doors lock on the lower level and require you override the security elsewhere, you’ll find a cave tunnel immediately up to the left as you exit back out.
On the ground in the middle of a clearing in the cave is the Skull.
Skull Effect: The Bandana Skull, once activated, makes it so that you have infinite ammo and grenades.Acrophobia Skull
This Skull can be found in The Silent Cartographer mission. In the circular arena in which you face off against the two Hunters on your way to find the security system override substation, carefully walk up the sloped edge of the metallic structure in the middle of the arena, then turn around and jump up onto the central section.
Walk up along the horizontal beam to find the Skull up on the raised section attached to the nearby rockface (partially covered by a tree).
Skull Effect: The Acrophobia Skull, once activated, makes it so that you can fly around levels by holding down the jump button.Hip Fire Skull
This Skull can be found in The Silent Cartographer mission. After disabling the security system and returning to the first underground facility with the stealthed Elite with an Energy Sword, you’ll go down a level and enter a room with several Covenant and two Hunters. Defeat them all and then approach the wide open well-lit sloped walkway/staircase leading down. Instead of walking down, carefully look over the edge and you’ll see the Skull far below on a small ledge. Carefully drop off the edge from slightly further down the slopes to land safely.
Skull Effect: The Hip Fire Skull, once activated, makes it so that all weapon zoom functionality is disabled.Assault on the Control Room
If you find all three Skulls and the Terminal in the Assault on the Control Room mission, you’ll unlock the Stowed in Snow trophy/achievement.
Assault on the Control Room Skulls
IWHBYD
Angry
Cowbell
IWHBYD Skull
This Skull can be found in the Assault on the Control Room mission. As you are continuing through the substructure in the Scorpion tank, you’ll enter an open-air space with a narrow bridge over a chasm. Defeat the numerous Covenant and turrets in the area (including a couple Hunters), and then cross the bridge and go left to the large snowbank in the corner.
Get out of the Scorpion and jump on top of it, then sprint jump from there into a small divet in the ice to find the Skull in the alcove.
Skull Effect: The IWHBYD Skull, once activated, makes it so that random, additional (often silly) dialogue will occasionally come from allies and enemies alike.Angry Skull
This Skull can be found in the Assault on the Control Room mission. As you are heading for Control Center Ziggurat after leaving the Scorpion behind, you’ll enter a valley with three metallic arches to the left of the doors you need to go through to proceed. Atop the furthest arch is the Skull.
Skull Effect: The Angry Skull, once activated, makes it so that enemies fire their weapons faster and more frequently.Cowbell Skull
This Skull can be found in the Assault on the Control Room mission. After reaching the bridge where Cortana tells you to commandeer one of the Banshees, look off the right side of the bridge and carefully drop down onto the narrow slanted strut below.
Tucked underneath the bridge in this narrow passage is the Skull.
Skull Effect: The Cowbell Skull, once activated, makes it so that the physics mass of objects is reduced, making them more easily displaced.343 Guilty Spark
If you find all three Skulls and the Terminal in the 343 Guilty Spark mission, you’ll unlock the Proto Gravemind trophy/achievement.
343 Guilty Spark Skulls
Fog
That’s Just… Wrong
They Come Back
Fog Skull
This Skull can be found in the 343 Guilty Spark mission. Early in the level as you see the destroyed suspended Covenant dropship in the tree, head up the slope to the left of the ship, and then jump up onto the rocks to the right just past the larger tree, and you’ll find the Skull on the ground nearby.
Skull Effect: The Fog Skull, once activated, makes it so that the Motion Tracker is disabled.That’s Just… Wrong Skull
This Skull can be found in the 343 Guilty Spark mission. After entering the underground facility and reaching the section with dead Covenant and blood everywhere, you’ll soon run into a surviving marine who is terrified and will fire at you while lying on the ground screaming. Unfortunately, to get this Skull, you’ll need to kill him. As soon as you do so, the Skull will drop from his corpse.
Skull Effect: The That’s Just… Wrong Skull, once activated, makes it so that enemies have increased awareness of the player.They Come Back Skull
This Skull can be found in the 343 Guilty Spark mission. As you lead marines to the evac point towards the end of the level, you’ll exit back outside and face a neverending swarm of Flood enemies. As you approach the large metal structure with the flying drones, avoid it and instead head right, going past the structure into the darkened forest.
Eventually you’ll walk underneath a large collapsed tree that’s led horizontally above you. Jump onto the rock by the base of the tree and then carefully walk across it to reach the higher rocky ledge at the other end of the log, where you’ll find the Skull.
Skull Effect: The They Come Back Skull, once activated, makes it so that Flood Combat Forms reanimated by Infection Forms are much more dangerous.The Library
If you find all three Skulls and the Terminal in The Library mission, you’ll unlock the Timeless Tomes trophy/achievement.
The Library Skulls
Tilt
Pop
Famine
Tilt Skull
This Skull can be found in The Library mission. Early on after emerging from a Flood-infested lower section, Guilty Spark will comment that you’re still alive as you emerge into a room with multiple flying drones fighting the Flood.
Turn immediately right and go up the slope at the top of the steps to find the Skull.
Skull Effect: The Tilt Skull, once activated, makes it so that both positive and negative damage multipliers are enhanced. For example, Plasma does more damage against shields, but less against health.Pop Skull
This Skull can be found in The Library mission. After riding the first elevator down, you’ll be able to go either left or right and fight your way through Flood enemies as you follow Guilty Spark. Regardless of which path you take, they both reconnect at the far end of the room. Much like the Tilt Skull described above, go up the metal slope(s). From here you’ll need to sprint jump across onto the pronged/egg-shaped structures, and then onto the narrow ledge on the inner wall where the Skull sits.
Skull Effect: The Pop Skull, once activated, makes it so that shooting Flood in their weak point causes them to explode.Famine Skull
This Skull can be found in The Library mission.
After riding the final elevator down to reach the final chamber, head straight out and down the ramp into the Flood-infested lower section. Immediately turn left to find the Skull on the floor in a small alcove.
Skull Effect: The Famine Skull, once activated, makes it so that weapons dropped by enemies contain half the ammo.Two Betrayals
If you find all three Skulls and the Terminal in the Two Betrayals mission, you’ll unlock the Outpost Discoveries trophy/achievement.
Two Betrayals Skulls
Tough Luck
Black Eye
Mythic
Tough Luck Skull
This Skull can be found in the Two Betrayals mission. After exiting the facility at the beginning of the level, make your way down to the snowy ground below and commandeer the Banshee as prompted. Before flying to the walkway above, you’ll want to fly even higher up to the top of the spire sticking out of the facility, just in front of the blue beam. Atop the spire is the Skull, which you’ll need to carefully get out of the Banshee while mid-air to reach.
Skull Effect: The Tough Luck Skull, once activated, makes it so that enemies always go berserk, constantly dive out of the way, and never run away from a fight.Black Eye Skull
This Skull can be found in the Two Betrayals mission. After riding the elevator from the two bridges down as you make your way toward the second pulse generator, you’ll reach the base of the valley where the three metallic arches are.
Cross directly over the arch ahead of you as you exit the lift and in the small cul-de-sac between the Flood biomass you’ll find the Skull resting toward the back.
Skull Effect: The Black Eye Skull, once activated, makes it so that your Shields will only recharge when you melee enemies.Mythic Skull
This Skull can be found in the Two Betrayals mission. After flying the Banshee up to the second generator location, land on the central platform. Interact with the panel in the center to unlock the door, then fly over to the door on the other side (not the waypoint door). Fight your way through multiple rooms of Flood-infected enemies.
Once through the long corridor, defeat enemies (including infected Hunters) in this final dead-end room to find the Skull sitting in the center of the room on a pedestal.
Skull Effect: The Mythic Skull, once activated, makes it so that enemies have increased health.Keyes
If you find all three Skulls and the Terminal in the Keyes mission, you’ll unlock the Priorities trophy/achievement.
Keyes Skulls
Catch
Blind
Piñata
Catch Skull
This is a speedrun Skull that only unlocks if you’re playing on Heroic or Legendary. You “catch” a Skull going up a grav lift in the first part of the level. It’s not clear what the limit is before it disappears, but we found doing it did it in under three minutes works. It also seems to stay active even if you die, but you won’t have many checkpoints because you’re not killing much. We recommend saving Active Camo that you can find in the entry area until getting to the part where you can punch a Jackal in the back:
Then, grab the Overshield before you get to the Grav lift (it’s near one of the green waterfalls).
You might not even really see the Skull as you go up the grav lift but just HOLD the “grab skull” button as soon as you start going up.
If you miss it, you should have a split second to reset the checkpoint to try again but if you’re late you’ll get an updated checkpoint and be SOL and need to redo this.
Blind Skull
This Skull can be found in the Keyes mission. After entering the ship via the gravity lift, drop down into the first major room (with the destroyed Wraith).
Head into the side passage through the archway, crouch under/jump over an additional destroyed Wraith, and head up the slope to find the Skull in the corner by the large locked doors.
Skull Effect: The Blind Skull, once activated, makes it so that your HUD and Weapons do not appear onscreen.Piñata Skull
This Skull can be found in the Keyes mission. After the cutscene ends once you’ve found Captain Keyes aboard the ship and put him out of his misery, you’ll unfortunately need to turn around and start whacking. Continually melee his body and eventually the Skull will spawn in, falling to the ground immediately in front of Keyes corpse.
Skull Effect: The Piñata Skull, once activated, makes it so that punching enemies makes them drop inert grenades.The Maw
If you find all three Skulls and the Terminal in The Maw mission, you’ll unlock the No Rush trophy/achievement.
The Maw Skulls
Stowed Reload
Boom
Thunderstorm
Stowed Reload Skull
This Skull can be found in The Maw mission. As you head to engineering via the cryo storage facility, you’ll eventually end up in the cryo pod room from the very beginning of the game. After defeating the drones and all Flood enemies, head to the back left-hand corner of the room (illuminated by fire) and jump from the collapsed walkway onto the beam against the back wall, where the Skull sits.
Skull Effect: The Stowed Reload Skull, once activated, makes it so that weapons continue to reload while stowed.Boom Skull
This Skull can be found in The Maw mission. In the large open room where you must destroy the 4 cores, head up to the back-right corner on the second level.
There you’ll find a small ledge with some debris that you can use to reach the corridor above. Instead of climbing the debris, go to the left of the debris and carefully drop onto the narrow ledge below. The Skull can be found in the corner to the left.
Skull Effect: The Boom Skull, once activated, makes it so that the explosion radius is increased by 2x.Thunderstorm Skull
This Skull can be found in The Maw mission. Early in the final Warthog run at the end of the level, you’ll begin driving through a winding set of tunnels. Intermittently you’ll see small offshoot tunnels along the inner wall that you can use as shortcuts.
The first tunnel contains nothing, but the second tunnel has the Skull on the ground to the right at the half-way point.
Skull Effect: The Thunderstorm Skull, once activated, makes it so that most enemies have their rank upgraded.Skull-Related Achievements / Trophies
You can unlock two Achievements / Trophies for collecting Skulls.
If you manage to find and collect all 39 Skulls in Halo: Campaign Evolved, you’ll unlock the Headhunter trophy/achievement.
If you manage to find and collect all 39 Skulls AND all 13 Terminals in Halo: Campaign Evolved, you’ll unlock the Collector’s Addition Trophy/Achievement.